Archive for August, 2011

「お誕生日おめでとうございます!」の工作

Saturday, August 27th, 2011

Finally a hopefully creative output as promised in the blog’s title. At least, I think so.

Sometimes buying a card for a birthday is okay, but often something self-made says “I spent a lot of time because you’re worth it!” In my case, it also says “I was in a hurry again and couldn’t buy you anything so here’s something I made myself”.

For the following birthday message, you need the following things:
-LibreOffice
-A colour printer
-Scissors
-Hole puncher
-Sticky tape
-Some present wrapping cords (human entrails might be an acceptable substitute in some cultures)
-Two bookshelves to hang this up in between (or pillars, candelabers, one-legged giants – whatever floats your boat)

Self-made stuff is the best!

First, write your message in LibreOffice. Define the page as landscape, make every letter a different colour, raise the size of the letters to 168 and print all the pages.

Then, use your favourite browser to head over to http://www.openclipart.org/ and download whatever clipart you like. If possible, save the graphics in .svg format (scalable vector graphics) because it’s the easiest format to resize the clipart. Print them as well.

Cut out the letters in whatever form you want. I went for hearts for this one, but stars are also nice. If your friend gambles, consider diamonds or piks. If you want to befriend a monkey, banana-formed paper would help your advancements.

Cut out the clipart and glue or sticky-tape it to approprate places.

Punch a hole to the left and to the right of each page you cut out. Tie a double-knot into some present wrapping cord and insert them through the holes from behind and let the rest hang down in front. Place another knot in the front to prevent the pages from sliding apart too much. Also, gravity will pull everything slightly down. Best image a wide half-circle when punching the holes, this will save you some aggravation.

Use the sticky tape to hang up this ornamental writing wherever it can be seen but where it won’t accidentally behead people who run into it a full speed and at neck-level.

頑張れ! Fix your favourite add-on for Firefox yourself!

Wednesday, August 17th, 2011

Probably my favourite add-on for Firefox is called “Link Extractor”:  When you right-click a link, it gives you the possibility to open all embedded urls in separate tabs or windows.

Unfortunately, the developer of said add-on hasn’t had time to update this add-on and the last officially supported version of Firefox is 3.x whereas today Firefox 6 was released on Ubuntu 11.04

If you really need this add-on (I couldn’t find one that provides similar features), you can fix it yourself:

1) Download the xpi from the official homepage

2) Open the xpi file with an archive manager such as file roller

3) Extract “install.rdf” to /some/folder

4) Delete install.rdf from the xpi file

5) Edit the extracted install.rdf with your favourite editor and change the line
<em:maxVersion>3.*</em:maxVersion>
to
<em:maxVersion>6.*</em:maxVersion>

6) Save the file, put it back into the xpi

7) Install the add-on via the menu Tools -> Add-ons, click on the toolset, select “Install Add-0n from File”, browse to the modified xpi and restart Firefox to activate the changes.

With this add-on, this works nicely. There certainly are add-ons where this simple tweak does not work but it’s worth a try, anyway.

很高兴!Chinese in TeX

Thursday, August 4th, 2011

Recently, good things have kept on coming my ways (see my previous posts).

One issue that’s been nagging me for quite a while is outputting simplifed Chinese in .tex files. Given all the information I had collected I knew I was really close but it never completely worked… until I got Japanese working in TeX.

From then on, it was a matter of changing some fonts and trying.

In the end, I found even two ways to produce Chinese in tex files:

The first:

1) Download this template for Japanese in TeX:
http://pastebin.com/tasDkhZ3

2) Replace the following lines:
\newenvironment{Japanese}{%
with
\newenvironment{Chinese}{%

and
\CJKfamily{min}%
with
\CJKfamily{gkai}%

and the tags \begin{Japanese} and \end{Japanese} must also be
replaced with \begin{Chinese} and \end{Chinese}

3) Install the following packages:
latex-cjk-common
latex-cjk-chinese
latex-cjk-chinese-arphic-gkai00mp

4) Compile using pdflatex <file.tex>

Then, compiling with pdflatex works provided you have the packages

Note:
For some reasons, the CJKfamily “bkai” does not contain all the
simplified Chinese characters, so “gkai” (or an equivalent font
alternative) is required.

The second:

1) Download this sample file:
http://scripts.sil.org/cms/scripts/render_download.php?&format=file&media_id=xetex_chinese_sample&filename=xetex_chinese_sample.zip

Unfortunately, the uploader created it on a mac where the fonts are
different. However, in XeTeX you can specify fonts that are available in
other programs and system-wide so you can just pick a nice font in
LibreOffice and specify that one.

2) Change the fonts in the .tex file to some different font. Use the complete name of the font as you can see it in LibreOffice’s font selection e.g. “AR PL UKai CN”.

3) Compile using “xetex <file>.tex”

4) Rejoice!

To be honest, this second template file is most likely a total overkill for a simple papers or some exercices as the output comes in vertical columns and must be read from right to left. But it’s awesome to see that such a thing is even possible in TeX!

太好了! Realtime monitoring when recording with a GT-10 via USB

Thursday, August 4th, 2011

With my recently acquired Boss GT-10, I wanted to make some sound recordings via USB, just for the fun of it. Connecting all the devices was no problem at all and I was quickly able to listen to my playing on the pc’s audio output.

Recoding however was a different beast. The manual says to connect the GT-10 via USB to the computer and turn off  direct monitoring and all should be well. Hm… almost. As I’ve seen in the rolandforum, there are quite some people who can record but they all complain about the same problem: During the recording, there is no “live” sound, they can only hear what they played after the recording.

Here’s how to fix that on Ubuntu 11.04 (Natty):

1) Start the GT-10, click on “SYSTEM”, open the USB submenu.
Change the settings as follows:
Driver Mode: Advanced
Monitor Cmd: Enable
Dir.  Monitor: On

Restart the GT-10

2) Connect the GT-10 to the computer

3) Open the sound preferences.
On the tab “Input”, select the GT-10 as input device:

Set the GT-10 as the default sound input device

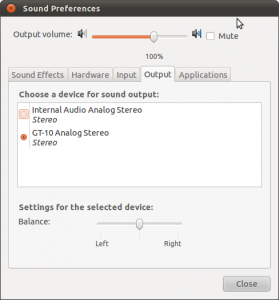
Switch to the Output tab.
Set the GT-10 as the default output device.

The GT-10 as output device

3) Connect your headphones to the GT-10

4) Record something and rejoice!

I think the main problem is that the manual focuses its descriptions of the difference between “Standard” Driver Mode and “Advanced” Driver Mode on the fact that in “Advanced” you can also send MIDI commands to the GT-10.
Another explanation as to why this is working might be that keeping Dir.Monitor “On” and plugging the earphones into the GT-10 rather than into the computer makes it work.

However that might be, if you follow the instructions above, you’re set for some USB recording with your GT-10.

Enjoy!