Posts Tagged ‘Linux’

Kali Linux: history with date & time

Wednesday, August 9th, 2023

In the Linux basic module of OSCP, you’re asked to configure your shell in a way that the history commands always displays the date and the time when the command was run.

Such information is valuable as evidence so this configuration tweak is well worth it.

If you’re the impatient type you might turn to some search engines for some quick results and you will definitely get a lot of hits. None of which work.

Why? All (most, at least) are written for the bash shell.

However, nowadays (2023) the default shell in Kali Linux is zsh.

See for yourself: run ‘echo $SHELL’ in your terminal.

Similar to the bash shell with a ~/.bashrc file, there is a ~/.zshrc file. Open the file with less and search for ‘history’ cat | grep the file and you will that there is an alias defined for history: ‘history 0’ (the numbers modifies the returned history lines).

In many posts, the fc is referenced, including the -E switch – most of the mentioned switches do not work as outlined in the posts.

Finally, I came across the -li switch which not only works (as in ‘does not return “bad option”‘). And this option actually returns the date/time info of commands run in zsh.

What does that mean for you?

Simply add another alias at the end of the .zshrc file:

alias history=’fc -li 0′
(that’s a zero. if you don’t add it, the history command will only return the 16 latest entries in the history file)

Now you can move on to the next task in the OSCP course.

Find your wifi adapter mac address without ifconfig

Tuesday, June 11th, 2019

In the latest version of Ubuntu (19.04), ifconfig is not installed by default anymore.

If you need to find your wifi mac address while you have no network connection, you cannot install ifconfig so you need a different way to find your wifi mac address:

Do `cat /sys/class/net/<network_connection_name>/address` to display the wifi’s mac address.

On a default installation, <network_connection_name> is most likely wlo1. If it’s not, use tab completion, in all likeliness there are only three files in the net folder: the wired network adapter, the wifi adapter and the loopback address.

IT Security for home users – upgrade your OS

Thursday, February 28th, 2019

The mainstream operation systems (including mobile OSes) have an upgrade function (in case of a mobile OS, whether your carrier releases updates is a different story….)

Use that function and install those updates!

macOS: Go to the Apple icon, select “About This Mac” and click on “Software Update…” Most of the updates require a reboot, even on MacOS.

Windows: From the “Windows Settings”, go to “Update & Security”. Check for updates, install what’s available and reboot.

Ubuntu: Run ‘sudo apt-get update && apt-get dist-upgrade’
(if you feel like protesting because <your valid reason here>, then you already know what you’re doing and you shouldn’t be reading this anyway (unless you want to fact-check my ramblings))
Other Linux versions use different commands, if you’re unsure, google for the appropriate command on your platform.

What’s going on with Ubuntu Certified Professional?

Monday, March 25th, 2013

Last week, I took the official Apple “Mac OS X 10.8 Essential Support Course” followed up by the official test. I passed so I’m a Apple Certified Technical Coordinator (ACTC) on top of all the other acronyms I hold.

Although I don’t work on Mac OS X every day, I have a good working knowledge of the general handling and the underlying OS. The course, which ran at quite a fast pace, summed up all the important points very nicely. The test featured the occasional tricky question and a score of 73% or higher was required to pass. And I passed.

We used the official Mac OS X 10.8 course book which contains precise information on Mountain Lion (although to be fair, the author probably only had to replace ‘Lion’ with ‘Mountain Lion’ to release a ‘new’ version or so). I actually understand now what happens after the kernel is loaded and what processes produce the login screen and what happens when a user logs in and so on.

On the other hand, the last official book on Ubuntu Certified Professional (UCP) was released in 2008 and was already out of date half a year later because of the energetic activism the good people at Canonical display all year round. No wonder that with all the changes that happened to Linux and all the changes that Ubuntu brought on itself, I still don’t feel secure about the internal workings on Ubuntu. Sure, there’s source code but I don’t think anyone actually reads that to get a general understanding of an OS. The man pages? Please! You mean those cryptic writings where the overview section is never really helpful because you need to have a PhD for reading man pages in order to understand them? Ah yes, the lack of useful examples is another gripe I have with man pages.

After passing LPIC 1, I was all fired up to become an UCP as well. But the lack of concise information put me off and the ever growing gap between the OS and the documentation put me off even more. Until today, no update to the Ubuntu Certified Professional book (available on amazon.com) has been released. I guess, even the author got fed up and felt he could use his time in better ways.  I sincerely doubt anything useful will be released in the future on that particular topic. And with Canonical pushing Ubuntu into a its own niche a bit more with every release, Ubuntu will have a hard time to become a viable candidate to compete against Windows in the enterprises – if that was ever their goal. Accordingly, the value of being a UCP shrinks and shrinks. Actually I’ve never really met anyone who was certified.

Maybe I should focus on LPIC 2 again, too…

Installing Galaxy on CentOS 6.3 with an mysql db and running it as a non-root user

Friday, February 8th, 2013

There’s a biomedical reaseach software called Galaxy. I didn’t know that either 😉
The installation is easy but it uses a sqlite ‘db’ and must be started by whoever wants to use it. In a production environment, this is not convenient and does not scale nicely. To be fair, the makers provide infos on how to run it in a production environment.

Here is one such installation in details. maybe this helps you.
-OS: CentOS 6.3
-DB: mysql
-Galaxy is run by a non-root user
-Galaxy starts at system boot

Lines starting with # must be run as root, some lines are comments so you can’t just paste line by line in your shell. Make sure you understand what you do (the line breaks make it a bit hard to read though, sorry)

After the installation, open firefox. To use galaxy, visit localhost:8080

**************************

===========================================================
= Installation of Galaxy with a local mysql DB on CentOS6 =
===========================================================

mysql
=====

# yum install mysql-server
# yum install mysql
# yum install mysql-devel

# service mysqld start

# /usr/bin/mysql_secure_installation

Set root password? [Y/n] Y
root pwd: <pwd>

Remove anonymous users? [Y/n] Y

Disallow root login remotely? [Y/n] Y

Remove test database and access to it? [Y/n] Y

Reload privilege tables now? [Y/n] Y

(http://wiki.galaxyproject.org/Admin/Get%20Galaxy)

(sets mysqld to start on reboot)
# chkconfig mysqld on

add another db user
——————-

/usr/bin/mysql -u root -p (enter pwd)

mysql> INSERT INTO mysql.user (User,Host,Password) VALUES(‘galaxy’,’localhost’,PASSWORD(‘<pwd>’));
mysql> FLUSH PRIVILEGES;

create a galaxy db
——————

mysql> CREATE DATABASE galadb;

grant user ‘galaxy’ all permissions on db ‘galadb’
————————————————–

mysql> GRANT ALL PRIVILEGES ON galadb.* to galaxy@localhost;
mysql> FLUSH PRIVILEGES;
mysql> quit

mercurial
=========

# yum install mercurial

galaxy installation
===================

# cd /usr/local
# mkdir galaxy
# cd galaxy/
# hg clone https://bitbucket.org/galaxy/galaxy-dist/

# sh galaxy-dist/run.sh

–> starts a local galaxy instance, can be opened in a browser with localhost:8080
^C –> quits

change settings for production server
=====================================

(http://wiki.galaxyproject.org/Admin/Config/Performance/ProductionServer)

disable developer settings
————————–

cd /usr/local/galaxy/galaxy-dist/
# cp universe_wsgi.ini universe_wsgi.ini.orig
# vim /usr/local/galaxy/galaxy-dist/universe_wsgi.ini
(line 370) debug = True –> debug = False
(line 383) use_interactive = True –>  use_interactive = False

use a local mysql db
——————–

set db connection in universe_wsgi.ini
(line 93) database_connection = mysql://galaxy:<pwd>@localhost/galadb?unix_socket=/var/lib/mysql/mysql.sock

securing the galaxy installation by running it as non-root
==========================================================

(create a local user “galaxy”)
# useradd -c “local user for galaxy installation” -d /home/galaxy -m -U galaxy
# passwd galaxy <pwd>

**********************
* running galaxy with the local user galaxy will throw an error
*
ssh galaxy@host
[galaxy@host ~]$ sh /usr/local/galaxy/galaxy-dist/run.sh
–>
OSError: [Errno 13] Permission denied: ‘./database/tmp/tmpeeJTbo’
*
* so we need to fix this by chowning the installation folder to galaxy
**********************

# cd /usr/local/galaxy/
# chown -R galaxy:galaxy galaxy-dist/

**********************
* now it should run
ssh galaxy@host
[galaxy@host ~]$ sh /usr/local/galaxy/galaxy-dist/run.sh
Starting server in PID <PID>.
serving on http://127.0.0.1:8080
* yes, it does
**********************

crontab fuer user galaxy:
SHELL=/bin/sh
@reboot $SHELL /usr/local/galaxy/galaxy-dist/run.sh >>/tmp/galaxy.log
**********************
* –> galaxy will run after the next reboot
* as the log file is in /tmp, it delete disappear after a reboot
* put it into /var/log and chown it to make it more persistent
**********************
* after reboot, you can check if galaxy was really run at system boot: * [user@host ~]$ ps -ef | grep gala
* galaxy    2864  2862  0 15:44 ?        00:00:00 /bin/sh -c $SHELL /usr/local/galaxy/galaxy-dist/run.sh >>/tmp/galaxy.log
* galaxy    2865  2864  0 15:44 ?        00:00:00 /bin/sh /usr/local/galaxy/galaxy-dist/run.sh
* galaxy    3148  2865  2 15:44 ?        00:00:07 python ./scripts/paster.py serve universe_wsgi.ini
* galaxy    3180  2862  0 15:44 ?        00:00:00 /usr/sbin/sendmail -FCronDaemon -i -odi -oem -oi -t -f root

=================================================

**************************

HowTo transfer files from Ubuntu 12.04 to your Huawei Smartphone

Wednesday, January 9th, 2013

For some reasons, Google dropped the USB mass storage file transfer in Android 4.x in favor of MTP which makes it hard somewhat hard to transfer files to and fro an Android-based Smartphone if you don’t have a Windows of Mac OS X installation around. This move has not been very popular with a lot of users who use Linux, especially since Android is Linux based, too.

However, apart from ftp’ing ssh’ing files, there is an alternative: Darran Kartaschew brewed up his own simple digital file player called gMTP

On Ubuntu, it can be installed via sudo apt-get install gmtp

Afterwards, connect your Smartphone to the PC with whatever USB-cable that came with the phone and (on a Huawei Smartphone), change the USB setting to “HiSuite”. gMTP will ask if you want to mount the SD-card or the device itself and there you go. If you select the device, you can browse the complete Android installation. No rooting required.

gMTP’s GUI looks somewhat rough and transfer is not that fast but for the occasional transfer, it should be enough. It’s still much better than iTunes 11 😉

HTH

Custom-sized Pearl…

Tuesday, January 8th, 2013

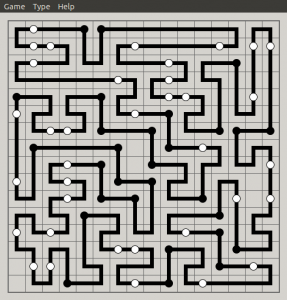
I wrote about Pearl before. This time, prepare for a custom-sized board! Originally I wanted to try a 25×25 board but even with an 8 core cpu und 16gb of RAM it takes forever to be created. So I settled for a 16×16 board.

After drawing all the obvious lines, it looked like this:

pearl_16x16_prep

And based on this very good preparation it took not even 10 minutes to finish the game:

pearl_16x16_finish

Back to programming and system engineering!

A useful command line tool: watch

Tuesday, November 13th, 2012

It’s 2012, almost 2013, I’ve been working with Linux for 9 to 15 years (depending on how you count) and yet occasionally I come across useful things unknown to me once in a while:

Enter ‘watch’

In a sense, it’s working the switch ‘-f’ in ‘tail’ but it’s doing its magic on files and commands.

By default, it displays every two seconds whatever command you supply it with. Rather than hitting up arrow and Enter every two seconds, issue one elegant ‘watch ps -ef | grep myprocess’ and lean back while your fellow linux newbies play the old hackin’-away-at-the-keyboard game.

Other than ‘have a look at the man page!’, I can’t really think of anything else left to write to here, so my job is done here.

tk,
m.

Creepy pearl solution :-)

Thursday, September 27th, 2012

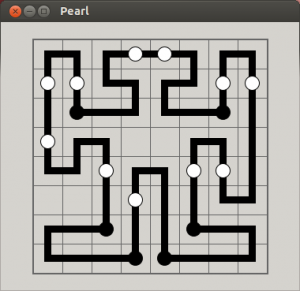
In the game called “pearl” you have to run a line through all dots on a board. The goal is to create a loop and the black and white dots have different requirements.

The principle is very simple and the game is some good diversion in times of stress.

Recently, I’ve come across this creepy solution:

Proof, we’re being monitored by machines? Who knows… I for one welcome our mechanical overlords. Can’t get any worse, can it…

If you want to try it, on Ubuntu it can be installed by the command “sudo apt-get install sgt-puzzles” which will install a whole package of other puzzles too.

(暴)GIMP for sysadmins

Thursday, July 8th, 2010

GIMP (short for GNU Image Manipulation Program – http://www.gimp.org) is a great tool – it’s versatile, it’s free and if you know it inside out, you swear by it. If you don’t know it very well, you just swear.

Starting from zero with GIMP is tough: No arrow cursor to select elements, whenever you paste something you cannot select other elements anymore etc. And all you wanted to do is to pimp up the screenshots for your documentation…

Believe me, I’ve been there. Working as a sysadmin, including screenshots with a couple of 1) and 2) added results in a much better description of anything than stringing “Window 1” and submenu 47b together a hundred times. Although it sounds perfectly simple, you have to figure out how to do things in GIMP which can be nerv-wracking because much of it is counterintuitive if you don’t understand the how and why. And if you don’t keep using GIMP, you quickly forget about it all and you have to start all over again.

Of course, there are tutorials about the GIMP. Lots of them. Written by friendly people with gallant intentions. You might even find what you are looking for. Oh, and recently there have been photo-editing tutorials in magazines as well. But I’ve rarely had to remove red eyes from OS screenshots.

In order to fight the forgetfulness that is mine I’ve decided to accumulate my meagre (and hard earned) knowledge on the matter that is GIMP. It’s not much but it’s proven useful to me and I hope it will be useful to you as well.

File Format

The GIMP’s native file format is .xcf but if you start with a screenshots, .png is fine and even .bmp will do. There’s no need to save the files in GIMP’s native file format or convert them.

Basics of Screenshooting

You can save yourself a lot of work by planning ahead:

  • Don’t take screenshots of your whole Desktop if you only need a dialogue window! Alt+PrtScn will save the active window only which is probably what you are going to down cut to later anyway. (These keys work on Debian/Ubuntu and Windows – I’m not sure about Macs and other flavours of Linux)
  • Resize windows before taking a screenshot! If you want to show users what options they have to pick from a menu or submenu, resize the program window as much as possible. Again, this will save you much work later.

Basic Operations

  1. Resize Screenshots (Scale)
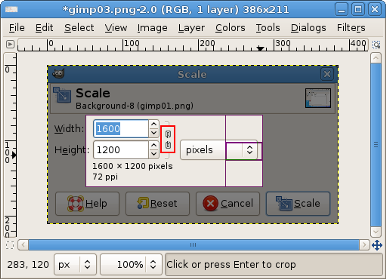
    Resizing is straight forward. Open a screenshot, in the menu “Image” click “Scale Image…” OR press Shift+T which will bring up the same dialogue.
    HINT: Try to remember some of the basic key combinations, you’ll be much quicker!In the Scale dialouge, you can specify the new Width or Height in pixels, milimeters and other measurements. If the chain is symbol is disconnected as in the screenshot below, the screenshot will not be resized proportionally. You can use the Tab key to jump onto the chain symbol and connect by pressing Space.

    Scaling in GIMP

    Scaling in GIMP

    If you make a mistake, Ctrl+Z will take you one step back. The history in GIMP is not cut off by some memory restraint, so feel free to undo all steps if necessary.

  2. Cropping
    The description in the Crop Tool says: Remove edge areas from image or layer. In other words: Keep a part of an image, discard the rest.There are two ways to crop an image:

    1)  The manual way: Using the Rectangle Select Tool, copy a part of a screenshot, open a new empty image, paste the selection and select “Autocrop Image” from the menu “Image”. This is all reliable and swell, but it’s quite slow.

    2) The better way: Select the Crop Tool (Shift+C), select an area (which will be high-lighted) and press Enter.

    Cropping in GIMP

    Cropping in GIMP

    The high-lighted area will automatically preserved, the areas outside the selection will be discarded and the image will be auto-cropped. Fast and handy! If the auto-crop does not happen, it’s just one click away.

    3) The super-duper, perfect, perfectionist crop:

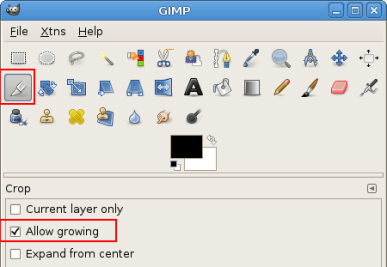
    Select the Crop Tool and check “Allow growing” in the options, as in the screenshot below:

    Cropping Options in GIMP

    Cropping Options

    This option will allow you to move and resize the crop selection. Move the mouse cursor over the crop selection. Depending on where the cursor is, the cursor changes to reflect how you can pull or move the selection. As soon as the cursor changes, you can use the arrow keys on the keyboard to change the size or position of the selection. This is especially handy for me because I like using a trackball which makes it very difficult to do exact selections.
    HINT: To get an even better shot at the perfect selection, you can press “+” on the numberpad to zoom in (“-” to zoom out again) and move the selection within the range of pixels.

  3. Cutting out parts of a screenshot
    You might have seen screenshots like this:

    huge dialogue window

    huge dialogue window

    They either make you wonder what this guys was thinking when the screenshot was made or what you were thinking when you made the screenshot if that guy happens to be you. If you think the screenshot is just fine, here’ s a hint: screen estate.
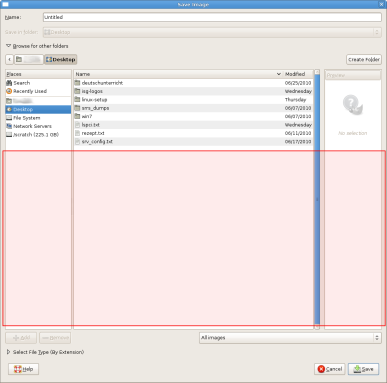
    In the next screenshot, all the area in red could be cut off and the screenshot would still retain all of the relevant information:

    wasted space in a dialogue screenshot

    wasted space in a dialogue screenshot

    See? If it’s your screenshot – retake it! If you don’t have access to the workstation where the screenshot was taken, you can also cut out part of the screenshot.
    Cutting out a part of a screenshot is slightly different to cropping. You will have to cut out the part in red, move the bottom part up so that it connects seamlessly to upper part, merge the layers and save the images.
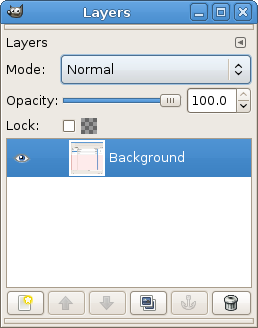
    Your best friend is the Layers dialogue which you can find in the menu “Dialogs” -> Layers. Alternatively, press Ctrl+L to bring up that dialogue.

    Layers Tool

    One of your best friends: Layers Tool

    Whenever you open a screenshot for editing, there will be one layer called “Background”.
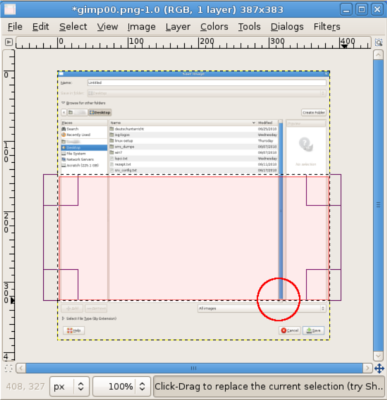
    Use the Rectangle Select Tool to select the area to be removed. If you’re the perfectionist, pay close attention to sections like scrollbars etc. to make sure that the boundaries of the compositions are not immediately recognizable (see the circle in red)

    Selection to Cut

    Selection to be cut out

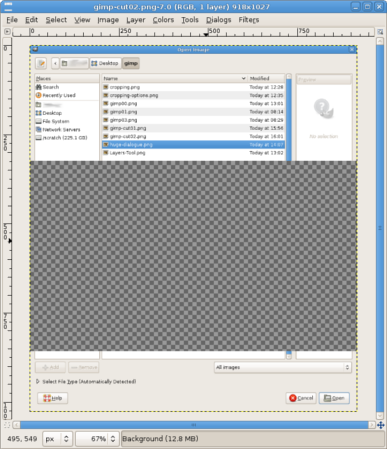
    Cut out the selection (Ctrl+X). Your screen should now look like the screenshot below:

    Cut Selection

    Cut Selection

    In the next step, you will have to move the lower part of the screenshot up to join the cuts.
    Again using the Rectangle Select Tool, select the bottom remains of the screenshot. Use the arrow keys on the keyboard if necessary to move the selection. The result should look as below:

    Selection to move

    Selection to move

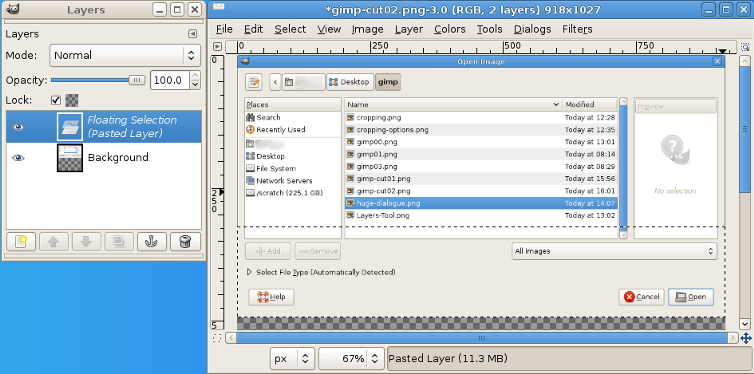
    When the selection is at the right place, cut the selection (Ctrl+X) and paste it again (Ctrl+V). Then, move the pasted image to join the upper part. Notice that the Layers dialog now displays a new layer: (Floating Selection (Pasted Layer)

    Moved Selection, New Layer

    Moved Selection, New Layer

    Maybe you noticed the how the lines of outline of the pasted image are running clockwise around the selection. This shows the selected layer. This has nothing to do with the Rectangle Select Tool. Also, it’s not possible to select a different layer in the Layers dialog. That’s why you have to right-click “Floating Selection (Pasted Layer)” in the Layers dialog and click “New Layer…”. The layer’s name changes to “Pasted Layer”, the running line around the layer turns yellowish. Now it’s possible to select a different layer again.
    HINT: If you’re working on a more complicated image, you can rename “Pasted Layer” to anything you like such as Logo1 etc. This makes it easier to identify what the layer contains.

    If you’re just doing screenshots, I recommend to merge the layers now. Several layers are not supported in .png files anyway so you when you try to save the image, you will be prompted to flatten the image anyway. Right-click “Pasted Layer” and select “Merge Down”. Only the “Background” layer remains.
    After another Autocrop (menu “Image” -> “Autocrop Image”) and another resize (menu “Image” -> “Scale image…” – remember to keep the width consistent across the screenshots if possible), the screenshot is ready for uploading.

Finishing Touches

  1. (Transparent) Rectangles Or Circles Within An Image
    These tools always rely on some selection and thus have one drawback: It’s hard if not impossible to change some settings such as colors or line styles afterwards unless you use the Undo function in the menu “Edit” to get back to the point before you applied the color to the stroke selection. If you have changed several other things since then, these will also be undone.
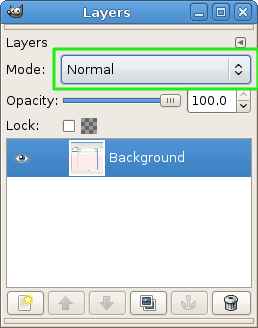
    Let’s say you wanted to highlight the Mode dropdown list in the Layers dialog:

    • Use the Rectangle Select Tool or the Ellipse Select Tool to draw a selection around the button.
    • Doubleclick the colour selector (by default the black area overlapping the white area), select a color to your likings
    • In the menu “Edit”, select “Stroke Selection…” Change the settings as desired. Click on “Stroke”

    The result should be similar to this:

    Highlightning in Images

    Highlightning in Images

    If you want to fill the selection with a slightly opaque fill, the selection still has to be active. Use Undo if you have already selected something else or deselected everything. Click on the Bucket Fill Tool (Shift+B).
    In the options, play around with the following settings:
    -The Opacity slider defines how opaque the fill will be.
    -Use “Fill Type” to select what color or even what pattern the selection should be filled with.
    -Affected Area: Most likely you will want this to be set to “Fill whole selection”, otherwise only the neighboring pixels within the clicked area will be filled

  2. Numbers and Text
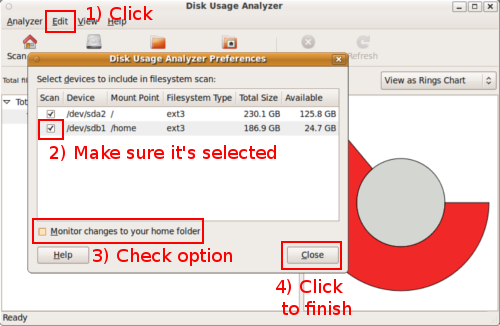
    Numbers on a screenshot can be very useful to describe a workflow. See the screenshot below for a fictitious example:

    Usage of numbering in a screenshot
    In this way, you can easily guide a user to complete a couple of configuration steps.
    HINT: If the configuration steps occur over a number of windows, try arranging on top of each other and you will get away with a single screenshot such as above. Although the option window is completely separate from the program window, by layering them you can keep everything nicely arranged.
    Occasionally, background images may interfere. Originally I wanted to keep the text for 4) on one line but the disk usage in red behind the close button made this impossible. Then it is your turn to be creative. In this case, inserting a line break or changing the font colour are both valid options.
    While preparing the above screenshot, I noticed that it’s possible to resize the Text box by dragging the corners. In older versions of the GIMP, that was not possible and the only way of changing a text box was to undo, undo, undo. This is definitely a useful improvement!

  3. Blurring Text Properly
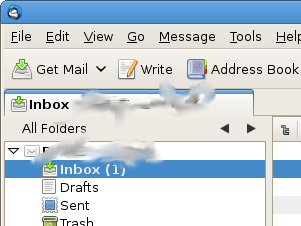
    Blurring text can be necessary if your screenshots contain sensitive information such as login names, host names, email adresses etc.
    The quick and dirty way is to use the Smudge Tool and go over the area to smudge a couple of times. However, if you are like me you will end up with something like this: (mainly because I’m using a track ball, mind ^_^)

    Smutty smudge

    Smutty smudge

    A much cleaner alternative is to smudge using the Rectangle Select Tool:
    1) Select the Rectangle Select Tool
    2) Draw a selection around the area to smudge
    3) Smudge your heart
    4) Profit! Or at least nicely contained smudges:

    Cleaner smudges

Conclusion

Again, GIMP is a great tool – if you know how to use it. I’ve been tearing my hair out again and again over simple edits but I hope you will not have to suffer the same.
If you have some additional tips, please let me know!